Your browser is not supported. Please upgrade it to the latest version or download a freeware browser Chrome for correct working with website.


How to build a deck
A full guide on how to build a deck on your own
Preparing to Build a Deck
Proper preparation will ensure you have an easy installation. By following this instruction, you will not face problems in the future and you will not have to reinstall the deck. Be careful, as each step brings you closer to having a safe, comfortable, beautiful, and Ontario Building Code compliant deck.
Choose a place to install the deck
The deck is usually installed on the north side of the house. A deck located on the west or south side of the house can get very hot in summer. Also, consider the prevailing winds so that you don't have to fight the elements instead of enjoying a cozy tea on the veranda.
Consider the area around you as well. Build your deck so that it does not face a busy road. The noise of passing cars can be disturbing. Remember personal space too: if you want privacy, choose a relatively unpopulated side of the house to build a deck.
Understand the legal issues
You can't just go and build a deck anytime without notifying anyone. Your deck design must be safe. The National Building Code of Canada and the Ontario Building Code sets out the basic criteria that your deck must meet. For this reason, you must obtain permission before building a deck. To do this, you need to contact your local municipality and bring a deck permit drawing there. In this drawing, you need to specify the location and profile sizes of boards, joists, railing posts, stair stringers, blocking, etc. You can learn more about how to get permission to build a deck yourself.
If you don't want to waste time on your measurements and drawings, Decks Toronto is ready to help! Order your deck permit drawing. We will make a blueprint for your deck, which will permit you to build.
If you are building your deck in Toronto, you need to make sure that your design, structural member spacing, and material selection comply with the Ontario Building Code.
Gather the necessary materials and tools
To fix the flooring you need decking accessories: nails, clips, fasteners. Please note that each brand of decking requires unique fixings. So, for the boards of the Trex Transcend brand, you need to select Trex clips from the same Transcend collection. Usually, a set of bindings is included with the boards. But if you do not have accessories, you can order them on the Decks Toronto website.
A standard set of fasteners usually includes anchoring screws, pneumatic fasteners, carriage bolts, galvanized screws, and form tubes.
From the tools, you need to have a hammer and hammer drill, shovel, circular saw and handsaw, garden hoe, drill bit, measuring tape, and a caulking gun.
Plan a convenient day
The best time to set up a deck is from April to November. Check the weather forecast for the week. You want a period without rain or snow, especially if you are going to paint your deck. Dry weather with low humidity is the best time to build a deck.
How to build a deck - step by step instructions
Decks Toronto has prepared for you detailed instructions that will help you install a simple deck without any problems. Below you will find 3D diagrams and illustrations guiding you through the most important steps in deck building in Toronto. Additionally, you can also watch the video, which clearly shows the stages of building a deck.
Step 1. Prepare a piece of land
Mark the boundaries of your deck and remove grass from this area. Instead, lay geotextiles in place and cover them with gravel. Mark the perimeter of the deck and the points where the support will be built. Use the plan to complete this step.
Step 2. Install concrete pillars and deck supports
Once you have your footing plan, you need to excavate proper diameter holes (specific to your deck plan and depending on the tributary load area to each footing) to a depth of 4 '. To excavate the footing you can either use a hand clam shovel combined with a metal pry bar to loosen the soil and remove stones, rent a hydraulic auger (we do not recommend using a 2 man auger), or hire a company specializing in footing drilling. Once the excavation for your deck is complete, as an option you can put 6 ”of gravel at the bottom of the footing, then insert a sono tube (so that its top is 6” above grade) into the hole and fill the hole with concrete. You can use the regular concrete mix (cheapest mix available at any building store) and mix it in the wheel barrel. You then need to insert a galvanized metal deck post bracket into the concrete footing on top.
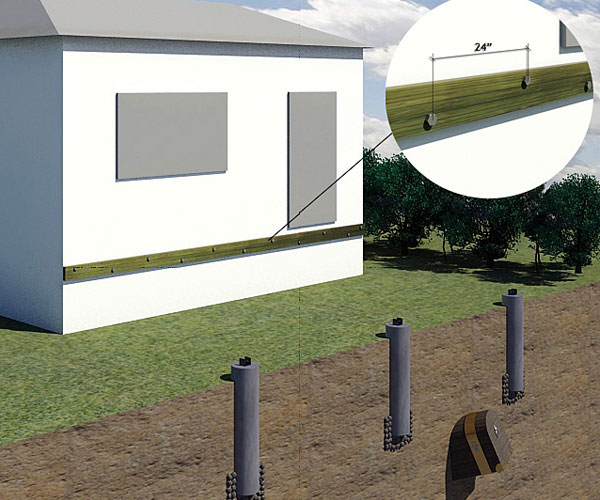
The bracket size needs to correspond to the beam size. Wait at least one day for the concrete to harden before you can carry on your construction. The next step is to attach a deck lag board to the house. If the house is made up of solid brick or concrete, you need to use 6 "long, ½" diameter masonry or concrete bolts. If your house wall is made of siding, veneer brick, or stucco, you need to use 12 ”long ½” diameter lag bolts to attach the lag board to the ledger of your house frame (assuming the deck is roughly the same level as the floors inside the house).
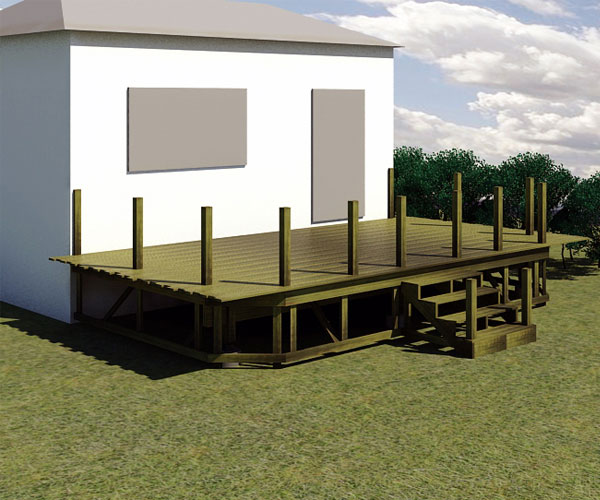
Step 3. Install the deck frame
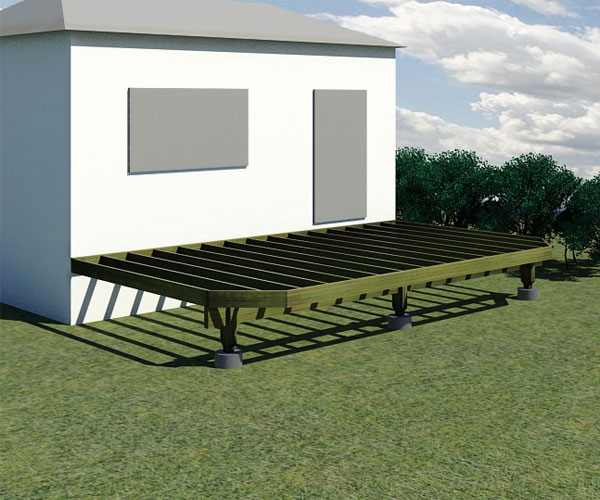
Once the deck footings are in place and the lag is securely attached to the house, the next step is to install the beam (s). In the picture above, the joists sit on top of the beam therefore the top of the beam is level with the bottom of the lag. The beam sits on top of 4x4 posts. Use a long straight piece of lumber and a level, measure from the lag, and find where the posts need to be cut for the beam to be level with the lag. Once the posts are cut, the beam can be spliced up and installed on top of the posts. The beam is attached to the posts with 2x4 or 2x6 blocks. The next step is to install all the joists, properly spaced and attach the joists to the lag (with joist hangers) and install one board at the front of the deck (rim board). All joists can be toe nailed from both sides into the beam.
Step 4. Install railing and stair stringers
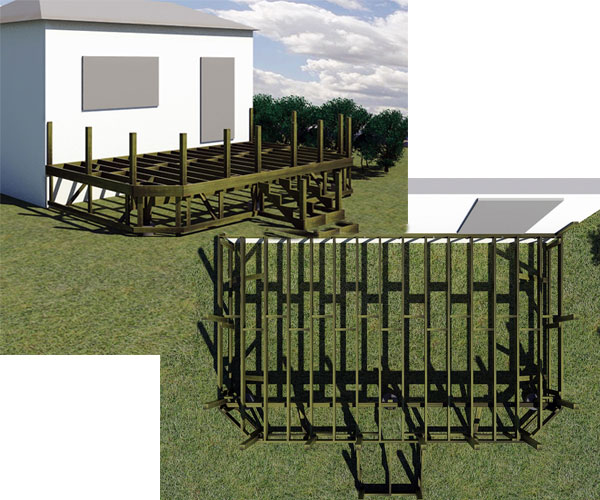
After the posts, beams, and joists are installed, the next step is to install railing posts, stair stringers, intermediate joist blocking (bridging), and frame for the skirt of the frame.
A block needs to be installed beside each railing post to securely attach it to the deck frame. Stair stringers are attached to railing posts at the bottom of the stairs. For the skirt frame, you will need a continuous 2x4 running along the bottom of the deck perimeter. This 2x4 can be attached in the manner shown on the diagrams.
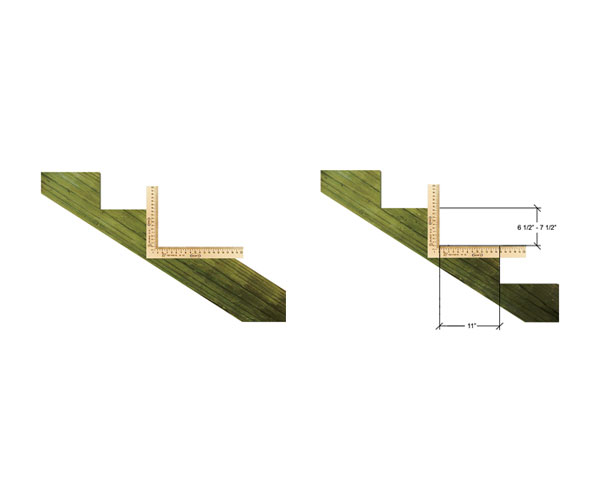
Stair stringers for decks are normally cut from a 2x10 or a 2x12 stock. Use the carpenter's square to mark out the stringer as shown on the diagram and cut the stringer with a circular saw.
Step 5. Install decking boards
The next step is to install all the decking boards. Use spacers to properly space the decking boards and attach them to joists with matching decking screws or a hidden fastener method. Have all the decking boards cantilevered on both sides past the edges of the deck? After all the decking boards have been installed, you can chalk a straight line corresponding to the edge of the decking board and cut the edges of the deck boards with a circular saw.
Step 6. Install the railings
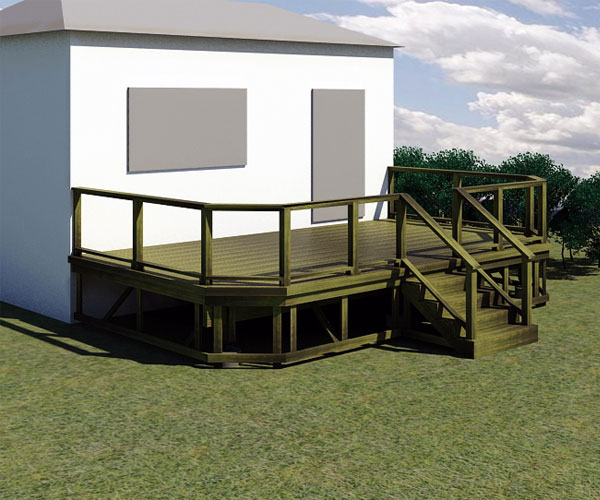
The next step is to install 2x4 rails on the railing, install step risers and install the top rail that will tie all the railing posts together. 2x4 rails are toe screwed into the 4x4 deck railing posts. You can use 1x6 and 1x2 for the stair stringers or a 1x8. In the picture above you will also see a 2x4 fascia installed around the perimeter of the deck to hide all the deck board end grains.
Step 7. Insert the railing panels
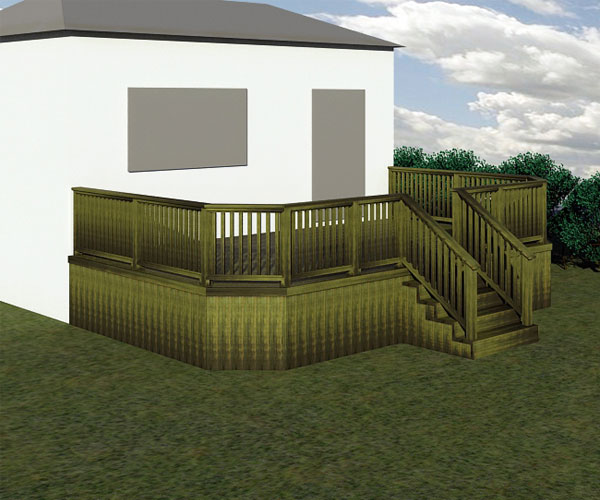
The final step is to insert the railing panels. For this deck, the railing panels are made up of 2x2 wood balusters spaced 4 ”apart and attached to 1x2 nailing strips. The railing panels are then screwed into the 2x4 rail frame. The skirt boards (normally 1x6) are attached with finishing nails and outdoor wood glue to the deck frame. You now have a professionally finished deck built according to the Ontario Building Code!
A professional will build a deck using this guide in 4-5 days. A beginner may need 7 days to fully assemble a deck with handrails and steps.
Common Mistakes When Building a Deck
- The homeowner left out the lighting and left no room for wires and lamps. In this case, the deck will have to be redone. Otherwise, you run the risk of hanging the entire deck with wires that will spoil the atmosphere. For this reason, remember to include lighting in your future deck plan.
- The deck is too large or too small against the background of the house. Plan the size and layout of your furniture carefully. You can make a small reconstruction in the backyard from scrap materials to get a clearer idea of the dimensions of the future deck.
- Not enough materials were purchased. To avoid this mistake, you can use the guide on how to calculate the required number of boards in advance.
Decks Toronto's Helpful Deck Installation Tips
- Be careful when stacking your deck. For your safety, wear safety glasses, gloves, and a respirator.
- You can't just throw away sawdust from a wooden deck. It may be dangerous. Never burn wood chips, as this could result in a fire.
- If you need to mark the perfect right angle, use the 3-4-5 rule. It says that one side should be 3 inches, perpendicular to it should be 4 inches, and the diagonal between them should be 5 inches.
Get in touch with a professional deck contractor
Building a deck correctly yourself can be tricky. Especially when a complex project is planned with a multi-level deck with a ladder and a pool. In addition, the self-construction of a deck takes a lot of time, which may not be. It is therefore possible to seek the help of a professional deck contractor.
You can find many suggestions, but before making a decision, we recommend that you read the guide on how to choose a good and reliable deck contractor.
Decks Toronto - your helper in building a perfect deck
Decks Toronto is an online store where you can purchase all the materials you need to build a quality deck. You can order composite, pvc, and wooden boards from us, as well as accessories for them. We also sell deck railings and deck lighting. You can buy everything from us in one place.
In addition, we are ready to help you build your deck. On our site, you can find free deck plans - standard blueprints with deck dimensions. And for those who want a unique deck without wasting time, we offer deck permit services packages - a turnkey ready-made plan.
If you still have questions about how to build a deck or want to clarify the details - call us at 437.837.0036. A consultant who understands deck-building basics will answer you.